- Getting Started with Ultimate Addons for Elementor
- Getting Started with Ultimate Addons for Elementor Pro
- How To Install The Ultimate Addons For Elementor Pro Plugin?
- How to Get License Key of Ultimate Addons for Elementor?
- Activate Ultimate Addons for Elementor Pro License
- How Can I Upgrade the License?
- How to Update Ultimate Addons for Elementor Plugin?
- How to update any plugin manually through FTP?
- About Beta Versions
- About Beta Versions
- How to Enable / Disable Widgets in UAE to Reduce Server Requests?
- How to White Label UAE?
- Getting Started with Ultimate Addons for Elementor Pro
- UAE Saved Sections
- How to create Google API key in Google Maps Widget of UAE?
- White Screen /500 Error After Plugin Installation
- How to Increase the Memory Limit of your site?
- Unable to see the Font Awesome 5 Icons in UAE’s widgets?
- Is Ultimate Addons for Elementor Compatible with the Latest Elementor/Elementor Pro?
- Translating UAE Content with WPML
- Enable Font Awesome 4 Support in Elementor
- Getting Started with Ultimate Addons for Elementor
- How to make Ultimate Addons for Elementor – Sticky Header On Scroll Documentation
- Introducing User Registration Form Widget
- How to Create a User Registration Form using Elementor?
- How to Create a User Registration Form with Only Email Field in Elementor?
- Frequently Asked Questions about User Registration Forms
- Google reCAPTCHA v3 in User Registration Form for Elementor
- Honeypot field in User Registration Form for Elementor
- Filters/Actions for User Registration Form Widget
- How to Integrate hCaptcha with UAE Login & Registration Forms
- How to Create a Facebook App ID for Login Form Widget?
- How to Create a Google Client ID for Login Form Widget?
- Introducing a New Login Form Widget for Elementor
- Filters/Actions for Login Form Widget
- Google reCAPTCHA v3 in Login Form for Elementor
- How to Integrate hCaptcha with UAE Login & Registration Forms
- How to Open a Modal Popup on the Click of an Elementor Widget?
- Modal Popup Widget
- How to Trigger a Modal Popup on the Click of a Menu Element?
- How To Close a Modal Popup on the Click of a Button or Text?
- How to Insert a Video in the UAE Modal Popup?
- What are the Various Options to Close a Modal Popup in UAE?
- How to Display a Modal Popup on Exit Intent?
- Modal Popup JS Triggers
- Woo – Products Widget
- How to display exact WooCommerce product with Query Builder?
- How to set Grid and Carousel layout for WooCommerce products?
- Filters/Actions for WooCommerce Products
- How to enable Quick View for WooCommerce Products?
- How to Exclude WooCommerce Products with Woo-Products Widget?
- How to Set Featured Products in WooCommerce?
- Woo – Products Carousel Does Not Display Correctly?
- How to Display Related Products with Woo-Products Widget?
- How To Add Rows And Columns to the Table?
- Table Widget
- How to add Table Header with Table Widget?
- How to add Table Content with Table Widget?
- How to add Sortable and Searchable Table? How to Show Entries Dropdown?
- How to Merge Columns and Rows in Table?
- How to Style the Table?
- Create Table by Uploading CSV
- Facing Issues with CSV Import?
- Image Gallery Widget
- How to Set Categories for Images?
- How to Add an Image Caption
- How to Set a Custom Link for the Image?
- How to Design Filterable Image Gallery?
- How to Open a Webpage with the Click of an Image?
- How to Set Scale, Opacity, Effects, Overlay Color for Images?
- How to Display Specific Category Tab as a Default on Page Load?
- How to Set Icon on Image Hover?
- Video Gallery Widget
- How to Set Categories for Videos?
- How to Design Filterable Video Gallery?
- How to Display Specific Video Category Tab as a Default on Page Load?
- How to Set a Custom Placeholder Image for the Video?
- How to Set Overlay Color on the Video Thumbnail on Mouse Hover?
- How to Show Video Caption on Hover?
- How to Show Video Category on Hover?
- Bulk Editing for Video Category Names
- How to Style Particular Item / Icon?
- Timeline Widget
- How to Change the Vertical Position of Arrow & Icon?
- How to Set On-Scroll Color for Connector Line and Icon?
- How to Set the Alternate Alignment for the Card Content?
- How to Manage Timeline on Responsive View?
- How Query Builder Works for Post Timeline?
- How to Set Post as Sticky?
- Enable Infinite Load Pagination for Post Timeline
- Posts Widget
- How Query Builder Works for Posts Widget?
- How to Enable Infinite Load Pagination for Posts?
- Filters/Actions for Posts Widget
- Filterable Tabs for Posts Widget
- Layouts for Posts Widget
- Posts Widget Carousel Does Not Display Correctly?
- Displaying Portfolios in UAE Post Widget Using Custom Filters
How to make Ultimate Addons for Elementor – Sticky Header On Scroll Documentation
Overview
The Sticky Header feature lets you keep important header elements like your logo, navigation menu, and call-to-action buttons always visible as users scroll. This ensures better accessibility and smoother navigation, leading to improved user engagement and a more professional browsing experience across all devices.
How It Works
When you enable the Sticky Header functionality, the header will automatically become “sticky” once the user scrolls past its original position. This is achieved by applying smart scroll behavior that keeps the header visible without interrupting the content flow. You can also customize its appearance, animation, and visibility on different devices to match your website’s design and performance needs.
Plugin Installation
To use the Sticky Header feature, make sure you have the required plugins installed:
- Ultimate Addons for Elementor Lite – Free plugin that provides the base widgets and integration features.
- Ultimate Addons for Elementor Pro – Required to unlock Sticky Header and other advanced functionalities.
Once both plugins are installed and activated, you can proceed with header creation and enabling sticky behavior.
Setting Up a Sticky Header
Step 1: Create a Header with Header Footer Elementor Plugin
- Navigate to UAE → Header & Footer.
- Click Add New to create a new header template.

- Give your header a name (e.g., Main Site Header).
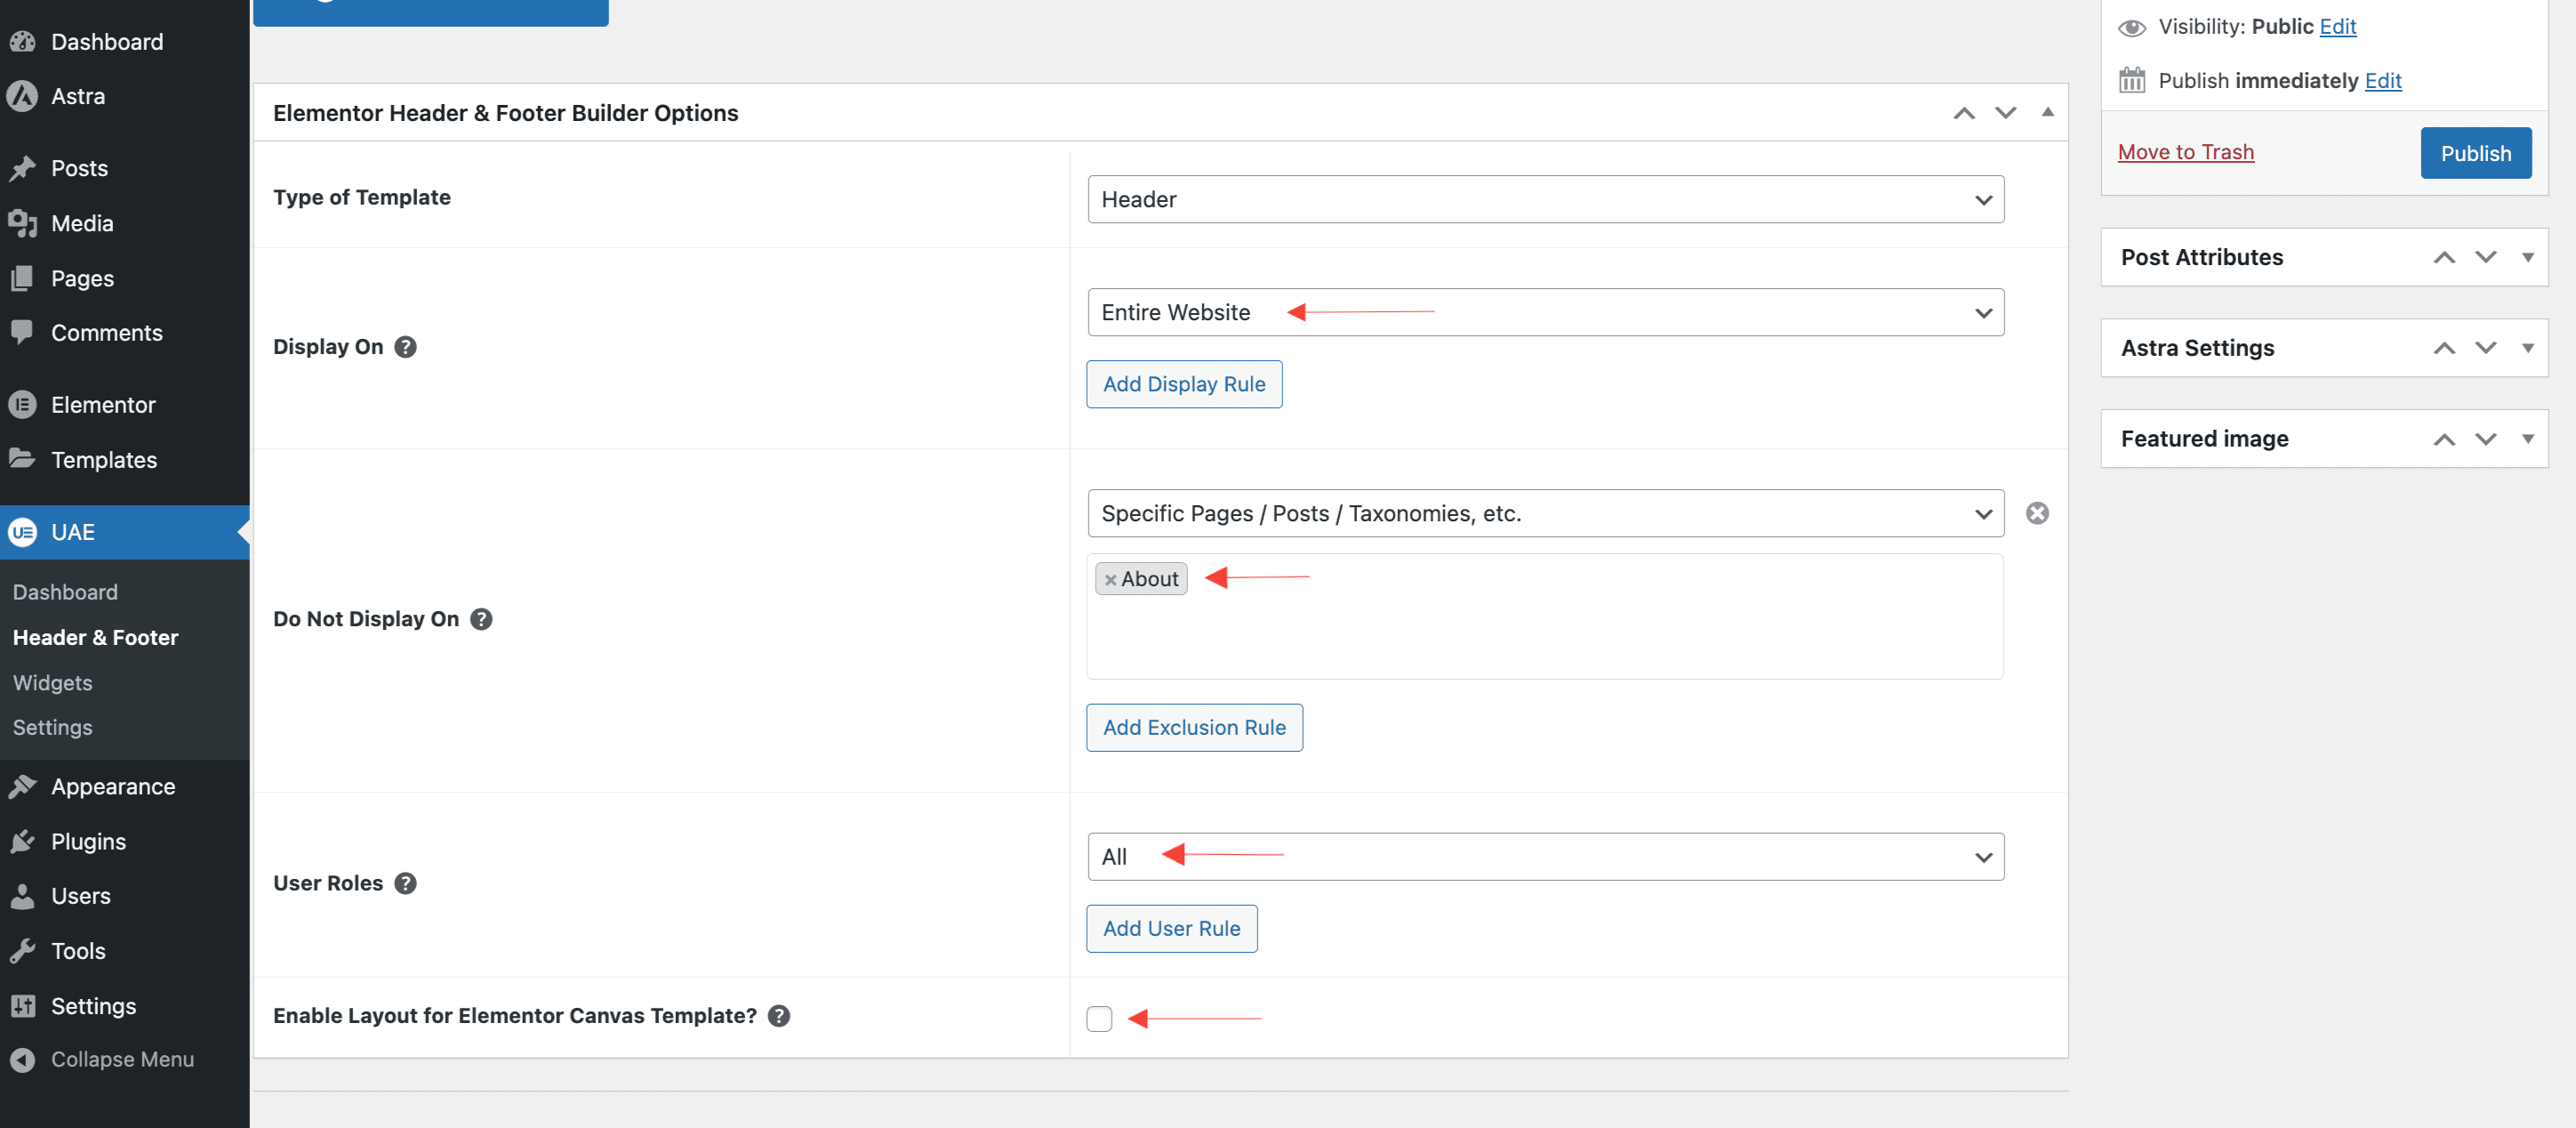
- Select Type: Header from the dropdown.
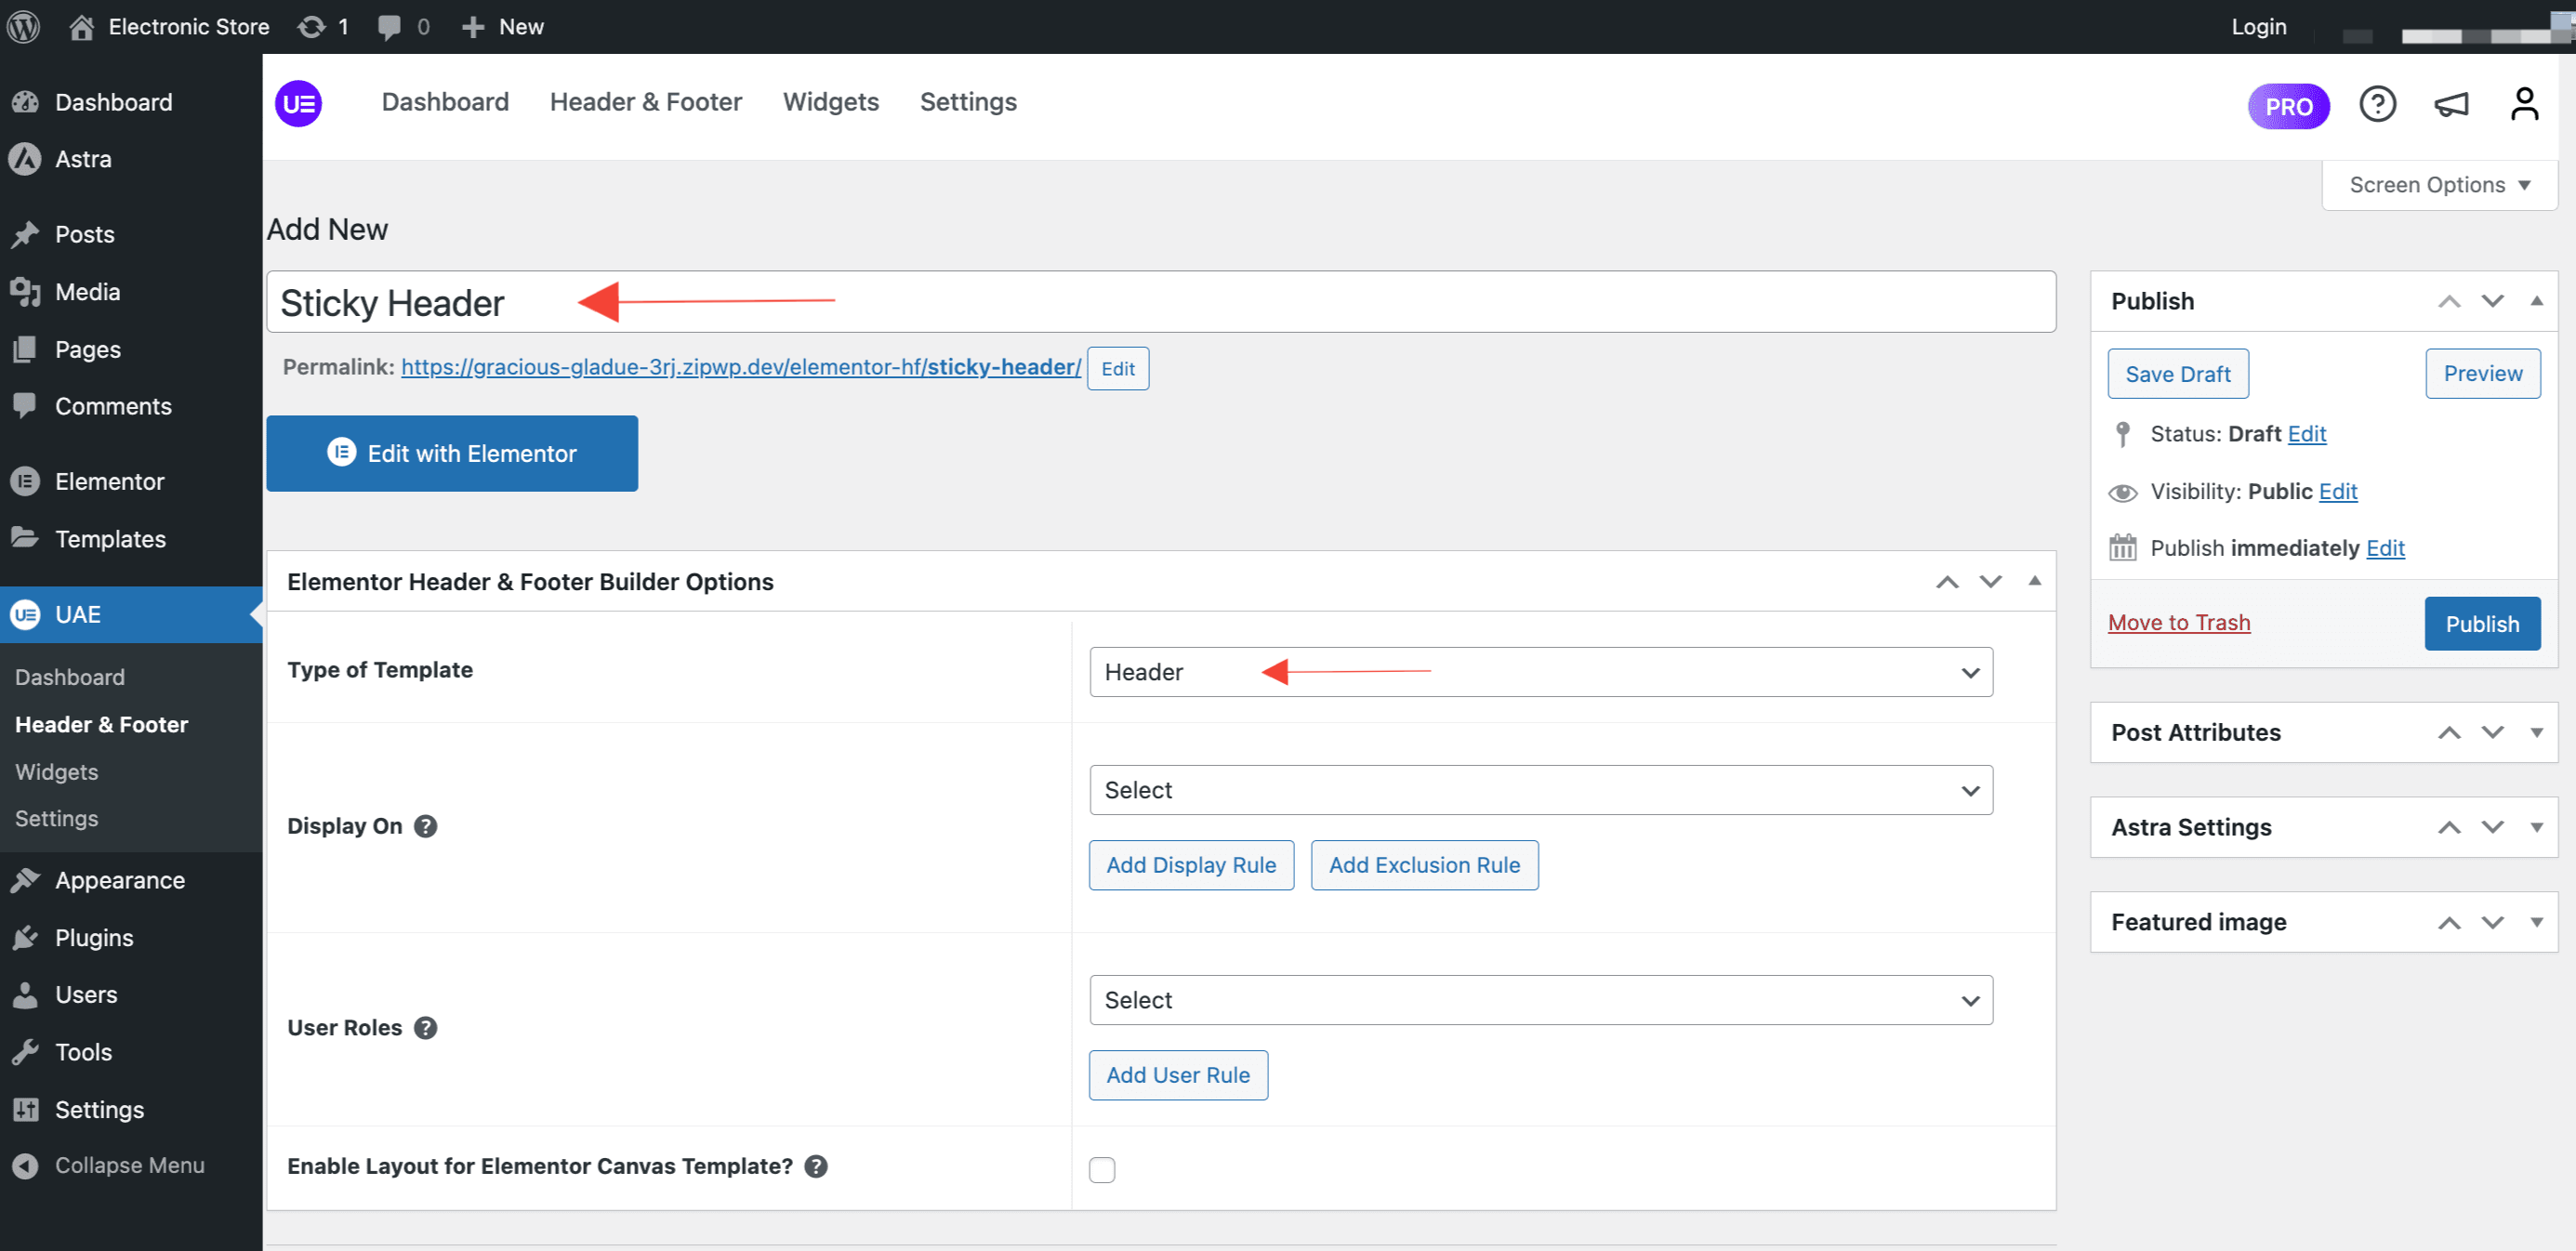
- Select where you want to display the header using the Display Rules setting. Choose where the header should appear (e.g., Entire Website or specific pages) using Exclusion Rule.
- Display the Sticky Header based on User Roles.
- Enable Layout for Elementor Canvas Template to display this layout on pages using Elementor Canvas Template.
- Click Edit with Elementor to design your header.
Step 2: Design Your Header
- Use Elementor’s drag-and-drop editor to build your header.
- Add elements like logos, menus, buttons, and social icons.
- Style the header to match your site’s branding.
Step 3: Enable Sticky Header Functionality from UAE Pro
- While editing your header in Elementor, select the outer section or container.
- Open the Advanced tab in the sidebar.
- Scroll down to find the UAE – Sticky Header panel.
- Toggle Enable Sticky Header to On.

Step 4: Configure Sticky Header Settings
Basic Settings:
- Visibility: Select which devices will show the sticky header (Desktop, Tablet, Mobile).
- Scroll Distance: Enable this to hide the header while scrolling down and show it while scrolling up.
Visual Effects :

- Transparent Header: Enable transparency for the header after it becomes sticky.
- Background Color: Set the background color that appears after the header becomes sticky.
- Bottom Border: Add a bottom border to the sticky header for better visual separation from the page content. Customize width and color.
- Drop Shadow: Enable and style a shadow behind the sticky header.
- Vertical: Controls shadow position vertically.
- Blur: Adjusts the blur amount of the shadow.
- Spread: Controls how far the shadow spreads.
- Shadow Color: Choose a color for the shadow.
- Advanced Behavior: Automatically hides the sticky header when scrolling down and shows it again on scroll up.
- Hide Threshold: Set the scroll distance before the sticky header hides.
Conclusion
The Sticky Header feature in Ultimate Addons for Elementor offers a smooth and accessible navigation experience for your users. Follow this guide to design a reliable, high-performance sticky header for your website.
Need help? Reach out to our support team or explore more articles in our knowledge base.
We don't respond to the article feedback, we use it to improve our support content.